First time color sorting!
Moments like this today make me feel so happy, so proud and like what we're doing is a success! :) Also, the joy for your own child's achievements is the biggest joy in the world, you could put it that way as well.
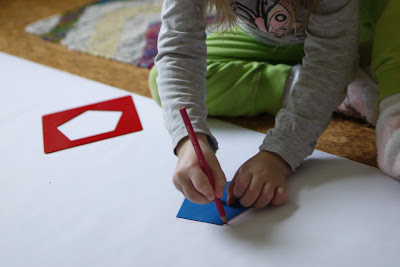
I have wanted to introduce color sorting for Adelaide. Even though she hadn't exactly shown any interest or recognition of colors, I thought it might be a good time to give it a try, as it's a nice activity for hands too. And, for example, Grimms has a really nice color sorting set.. (If you care, it's like this.) But no matter how nice it looks, the price is just insane! I tried looking for cheaper alternatives on Etsy, but they are not even that much cheaper, and not as nice as Grimms.
So I gave DIY (do it yourself) a try. Must say, I can be skeptical on DIY materials, even though, of course, I have already made many myself. They can lack in quality, beauty and endurance, if compared to nice actual toys. However, they have their pluses too - if a toy you just have to store away or sell, once the interest for it is gone, many DIY materials you can re-use. Actually, I guess, as long as DIY material is made nicely, actually investing some decent thought and good raw material, it can be really, really nice. (To explain further - I'm not into those once-usable DIY materials for children that much, you know, the ones that break while using once or twice and are not going to last more than that. As in Montessori - if I actually make a material, I make it with hope, that it will be serving a good long time and purpose.)
And the last time I finally had a chance to go to one fabric and craft shop to buy some materials, I was happy to find there a lot of cheap items, that I picked up with a thought of making some materials for Adelaide. And even with all my self-doubt.. Here it is! :)
So I made the first color sorting activity for Adelaide. I thought it best to start only with 2 colors. Introducing the principle and less confusing. But seeing, how much she liked it and how she was able to do it so well, I'm thinking might need to introduce more colors soon. (Maybe 6, usually they have 6 colors.) I'm really happy of how this turned out! It wasn't for free, I still counted, that it cost around 13 euros to make this (and it would be around 25 euros with 6 colors), but it's still so much cheaper than Grimm's! Plus, the parts here are re-usable.

So, if for one I was surprised, how pretty the work turned out.. Then another thing - I was surprised, how interested Adelaide immediately was! And how much she liked doing it!

And the third, of course, I was surprised, that she can actually recognize and separate the colors! :D And she didn't need any teaching.. Actually, I took a video of her doing it (as I was demonstrating it) for the very first time. And as you can see.. She put one wrong at first, but immediately saw (herself!) the mistake and fixed it. (While I was still thinking, how to approach that..) :) And HOW HAPPY she is about her finished successful work! :) Amazing.
She was doing it without the tweezers at first, but afterwards she got interested and tried using them. She even was kinda able to, I was doubting this too, as they are quite hard.. But I'm sure they will be a hit. :) (The tweezers were the most expensive part of this, 7 eur, they are meant for sugar cubes.)
And after the video ends.. She did this many times in the row, starting over and over again. And once totally done.. At first I just left them on the carpet right there, as there hadn't been a space made for them in the shelf yet, and Adelaide came and lifted the tray and was putting it in the shelf herself! :D Such a Montessori child. ;)


Nii suur rõõm :) "O-hooo!"
ReplyDelete